


Ecommerce Pro / Store settings
Customized shipping zones at checkout
Your store's automatic checkout displays shipping options in real time when your shopper is about to checkout. By default, all your active carriers are displayed, regardless of whether they can deliver to the address the buyer entered.
This can cause a parcel to appear available at checkout, but at the time of generating the waybill it fails because it does not have coverage in that area, generating errors, incomplete orders and a bad experience for your buyer.
The customized shipping zones allow you to define exactly in which states or cities each parcel operates. The checkout filters automatically: when your buyer enters his address, the system detects his location and only shows the parcels that can deliver there.
This function applies to the checkout of your store connected to Envia. If you don't have the checkout active yet, see the article Live checkout rates (checkout).
How the automatic filter works
Each time a buyer enters their address at checkout, the system:
- Detects the state and city of destination.
- Check the shipping zones you have configured for each parcel.
- Displays only parcels with coverage at that destination.
If you set restrictions by type of service within a zone - for example, only economy fare and no express - the checkout also applies this filter automatically.
⚠️ If the buyer's destination does not match any configured zone, the checkout will display a message indicating that there are no options available for that location.
💡 Packages that you do not assign to any zone will still appear for all destinations, without restriction.
Steps to set up a new shipping zone
1. Open your store's checkout configuration
- Go to the Ecommerce Pro > Configure your store.
- Select your store and click Settings.
- Locate the automatic quotation in checkout section.
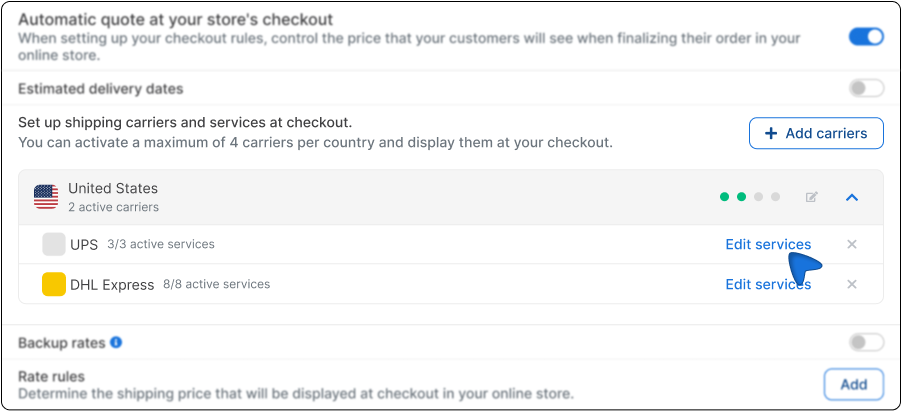
2. Select the package to which you want to assign a zone.
You will see the list of active packages in your checkout. Next to the name of each one you will see how many services it has active.
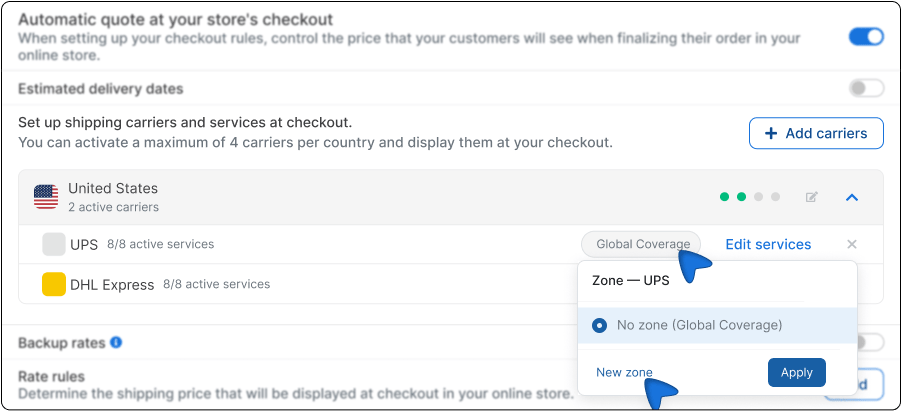
Click the Global Coverage that appears to the right of the package you want to configure and select New area.
3. Assign a name and description to the zone
The form will open New shipping zone with the following fields:
- Name of the area - Give it a name that will help you identify it. For example: North Zone, CDMX only, Economic Southeast. This name is only seen by you from the platform; your buyer does not see it.
- Description of the area (optional) - Add a note to remind you of the purpose of the area. For example: “States where DHL operates on standard rate only”.”.
4. Define the geographical coverage of the area
Select the states or cities covered by this zone. You have two ways to do this:
- Using predefined regions At the top of the form you will find shortcuts: All the country, North Zone, Downtown, CDMX, Western Zone, South Zone and Southeast Zone. If the package coverage matches any of these groupings, select it and the corresponding states will be checked automatically.
- Selecting state by state If the coverage is more specific, scroll through the list of 32 states and check those that apply. If the parcel only covers certain cities within a state, click on Cities next to the state name to select only those that apply.
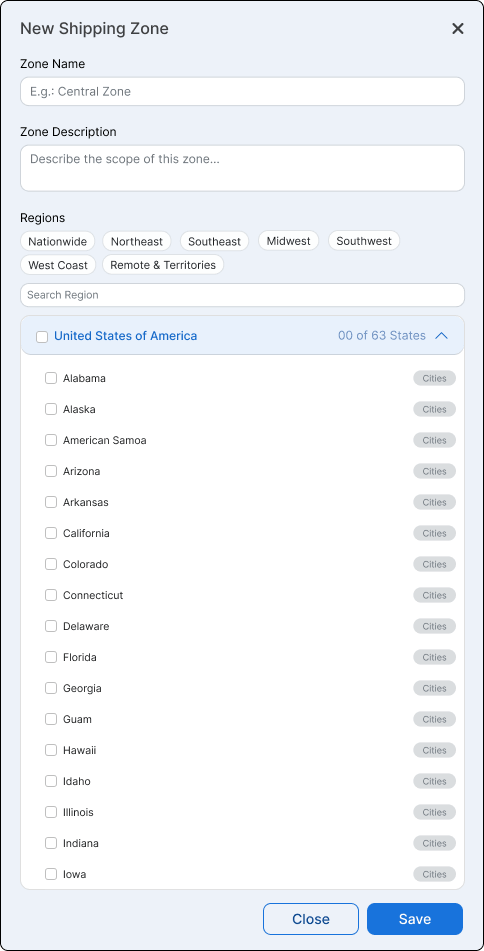
You can combine both options in the same zone. For example: check Nuevo León as a whole and only Tijuana within Baja California. Use the search engine Search region to find a state or city quickly.
5. Save the area
Click Save. The zone will be created and assigned to that package.
From that moment on, that package will only appear in the checkout when the buyer's destination is within the states or cities you configured.
What you should keep in mind
- A parcel may have more than one zone. If a parcel operates in the north and south but not in the center, you can create two different zones and assign them to the same parcel.
- You can deactivate a zone without deleting it. Each zone has an active/inactive switch. You can pause and reactivate it when needed without losing the configuration.
- This setting only applies to your store checkout. Guides that you generate manually from Envia are not affected.
- If you do not set up any zones, your checkout still works the same. This function is completely optional and does not modify your current operation until you configure it.
FAQ
Can I use the same area for several stores? Yes, you can create a zone once and assign it to multiple stores. Each store independently manages which parcels operate within that zone.
What happens to the parcels that I do not assign to any zone? They still appear normally for all destinations, without restriction. Only the packages that you configure with specific zones are limited by this configuration.
Can I configure zones by neighborhood or zip code? At the moment, zones are defined at the state and city or municipality level. Coverage by neighborhood or zip code is not available in this version.
Does this feature affect the guides that I generate manually from Envia? No. The zone filter applies only to your online store checkout. The guides you generate directly from the platform are not affected.

Did you find this resource useful?