Scheduled maintenance on Envia.com: Thursday, October 29, 12:00–12:30 a.m. Login, APIs, and operations will be unavailable.


Check the tracking center
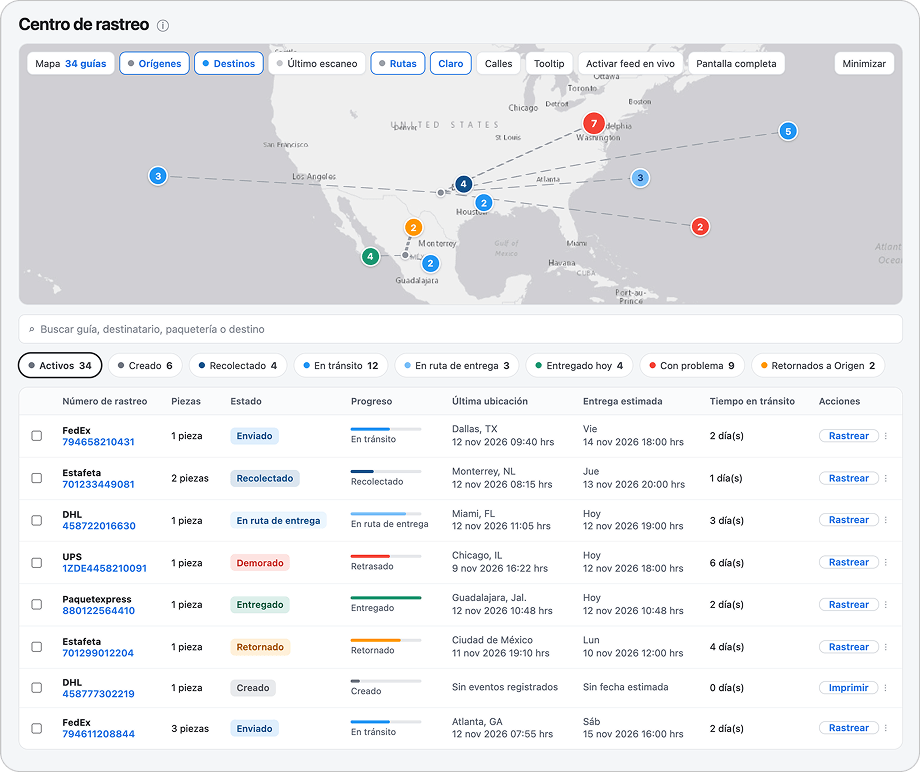
Tracking center is the screen your team uses to follow the account’s active shipments. It shows which stage each label is in, which ones need attention, and which ones were delivered today. It matters for the day’s operation, because you find a package and act from the same place. When you use it, you filter the list, see it on the map, and open the label you need.
Open the tracking center
Section titled “Open the tracking center”- Sign in to your Envia.com account.
- Open My Shipments.
- Choose Tracking Center.
The page is called Tracking center. Under the title you read Active shipments synced in real time.
Filter shipments by stage
Section titled “Filter shipments by stage”The filters at the top count shipments from the last 30 days. Select one to see only that stage. If you select a filter other than Active again, the list returns to Active.

| Filter | What it includes |
|---|---|
| Active | Shipments still in progress. Labels that are only created are listed under Created. |
| Created | Generated labels that have not moved yet. |
| Picked up | The carrier has already collected the package. |
| In transit | The package is moving between distribution centers. |
| Out for delivery | The package is on the way to the address. |
| Delivered today | The package was delivered today. |
| Issue | The shipment needs attention. A shipment more than 4 days past the estimated delivery is included here. A label in Created or Picked up is not marked late. |
| Returned to Origin | The package is returning, or has returned, to the sender. |
Search for a label or an order
Section titled “Search for a label or an order”In Search you type the label, the recipient’s name, the carrier, or the destination. If you change the search type to Order #, the text is compared with the order number. When you search or change the filter, the table returns to the first page.
See shipments on the map
Section titled “See shipments on the map”The map draws the shipments on the table page you are viewing. Each page has up to 50 labels. When you go to the next page, the map changes with it.
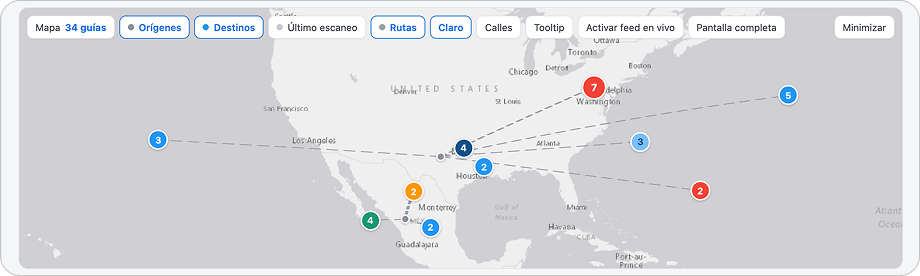
On the map bar you choose what is drawn:
| Layer | When you enter |
|---|---|
| Origins | On. The point is gray. |
| Destinations | On. The color follows the shipment stage. |
| Last scan | Off, until you turn it on. |
| Routes | They turn on by themselves when the filter has 1 to 25 shipments. With more than 25, or with zero, they stay off until you turn them on. When you change the filter, that choice is calculated again. |
If several shipments share the same destination, the map groups them in one point. The number on the point is the number of shipments. A click on the group zooms the map in. A click on a point opens that label’s detail.
Full screen shows the same filter row over the map. Light and Streets change the map style. The Tooltip button chooses what you see when you hover a point, for example the name, the status, the estimated delivery, the order, or the package.
You can drag the bottom edge of the map to give it more height, hide it with Minimize, and show it again with Expand.
Follow live events
Section titled “Follow live events”Turn on live feed is off when you enter. When you turn it on, the Live events panel opens next to the map.
- Shipments lists recent movements of your labels. A canceled label does not appear on this tab.
- Orders lists recent orders, including those that do not have a label yet.
Follow on the map selects the newest Shipments movement on the map. Clear empties only the tab you are viewing, until you reload the page. In Feed settings you change the font size, the visible fields (Carrier, Recipient, Description, Status, and Location), and the sound of each stage. You can also hide the cards of one stage.
Review the table
Section titled “Review the table”Each row is a shipment. When you enter you see Tracking number, Pieces, Status, Progress, Last location, Estimated delivery, Time in transit, and Actions.
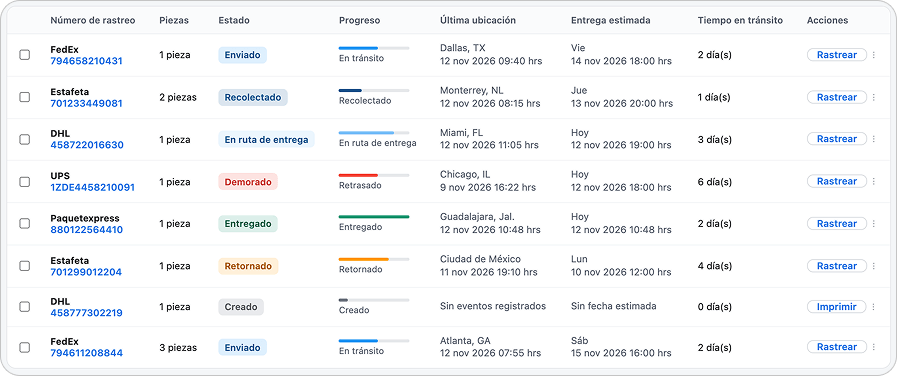
Progress marks five steps: Created, Picked up, In transit, Out for delivery, and Delivered. The color matches the stage.
In Estimated delivery you see the expected date. If the shipment was already delivered, the cell shows the delivery date. A created, returned, or canceled label leaves the cell as No estimated date. If there are no movements yet, Last location says No events recorded.
Time in transit counts the calendar days the label has been moving. On a shipment with several pieces, that cell is empty on the child pieces.
If the label has more than one piece, Pieces opens each one. Each piece shows its own status.
Select a row, or the tracking number, to open the detail. There you see the tracking history and the label documents.
At the end of the filters, the button with the table icon opens Edit Columns. From there you show or hide columns and save with Save. You will see Settings saved successfully. Email, Phone, Origin, Destination, Favorite, and Internal notes are among the columns you can turn on.
If you select several rows, the bar at the top shows how many labels you selected. Copy labels copies the tracking numbers. Clear selection removes the marks.
Act on a shipment
Section titled “Act on a shipment”The row button changes with the case: Print when the label is created and already has a label file, Track to open the detail, or View Ticket if a ticket already exists.
The ⋮ menu offers these actions, only when they apply to that label:
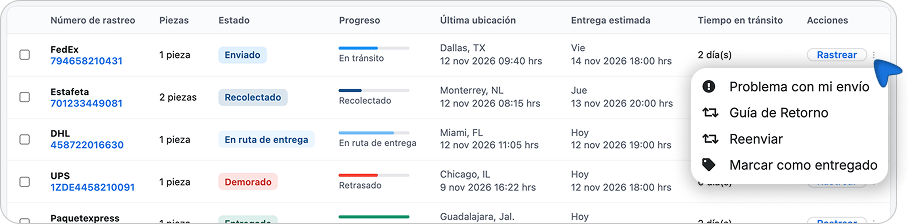
- Report a problem with a shipment. If the label already has a ticket, the option becomes View Ticket.
- Link shipment to order, when the label is not linked to an order yet.
- Create Return Label, when the label has a label file.
- Forward.
- Mark as delivered.
With the Phone column visible, you open WhatsApp with the recipient’s number. With the Email column visible, the link opens an email with the tracking link. Next to that email, Send last scan to the recipient sends the latest movement. The button appears only on the main label and when the recipient has their own email. If the email is empty, or it is noreply@envia.com, the button is hidden. After you send it, you see Message sent.
If a shipment does not appear
Section titled “If a shipment does not appear”- The list covers the last 30 days. An older label is checked in My Shipments.
- The map follows the table page. A label on another page is not drawn until you reach that page.
- Canceled labels do not appear on the Shipments tab of Live events.
- Incidents are checked in their own section. This screen does not mix them with the rest of the shipments.
Frequently asked questions
Section titled “Frequently asked questions”Why use Tracking center if I already have My Shipments? My Shipments lists the labels for the period you choose, with archive, export, and the full actions menu. Tracking center gathers the active shipments from the last 30 days, with the map and live events.
Does my buyer see this screen? Your team uses Tracking center. Your buyer checks your brand’s tracking page, or the label link you share with them.
What happens if I mark a shipment as delivered? The row keeps your delivered mark. The carrier status, the filter, and the map color stay the same.